JOINING THE DOMAIN USING A WINDOWS VPN CLIENT
Joining a domain using a VPN client is a little more involved, but not complicated. This method may work with other VPN clients, so long as they have the option to connect to the VPN before logon, but this explanation uses only the Windows built-in VPN client. Without the ability to connect before logon, there is very little advantage even if you can join the domain, as you would not actually be authenticating to the domain. I will assume the server end, RRAS, is configured and working for VPN client connections.
- Log on to the PC you wish to join the domain with a local administrator account
- Only 1 network adapter can be enabled on the PC joining the domain, and preferably a wired connection. If any others exist such as a wireless card, disable until domain joined. On occasion Bluetooth adapters will also conflict, so I recommend disabling them as well.
- Establish a VPN connection. If not familiar with doing so:
- From the network and sharing center choose “Set up a new connection or Network”
- Select “Connect to a workplace”
- Choose “Use my Internet connection (VPN)”
- Enter the public facing FQDN of the corporate VPN server such as VPNserver.MyDomain.com and enter a friendly name for the connection, anything you like. It is also very important to check the box “Allow other people to use this connection” as you will soon have a domain account which will require access to this VPN connection.

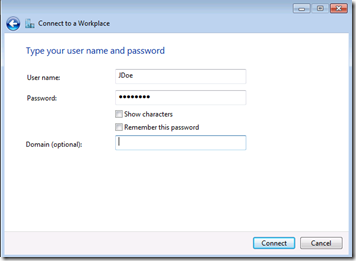
- Enter a User name, which ideally is the user that will be using the connection once joined to the domain, but can be any user name that is authorized to connect to the corporate network via VPN. If you use a name other than the ultimate user of the PC they will simply have to change the user name during in the connection wizard, the first time they try to connect. Enter the password and choose connect. For security reasons I don’t recommend checking “Remember this password”.

- If prompted for a network type after connecting, choose “Work Network”.
- Presumably you were able to establish a connection. However while connected if you did an NSlookup from a command line for the server name, you will see it fails. Try an NSlookup for the FQDN of the server, and it will succeed. Thus, we need to configure DNS for the VPN clientbefore proceeding.

- Disconnect the VPN client
- In the network connections window right click on the VPN/PPP connection and choose properties | Networking tab | highlight Internet Protocol Version 4 (TCP/IPv4) and choose properties | Advanced | DNS tab | and enter the IP of the corporate DNS server under DNS server addresses and the internal domain suffix such as MyDomain.local in the “DNS suffix for this connection box. If admins need to connect to the remote client PC for administration by name check the box “register this connection’s address in DNS” but I would discourage this as the IP can change frequently and cause issues. Also on the “IP Settings” tab leave the option “Use default gateway on remote network” checked, at least for now, so that all traffic is forced to the corporate network while the VPN is connected.

- Now you can try joining the domain
- Connect the VPN client
- Right click on “Computer” (formerly My Computer) and choose properties.
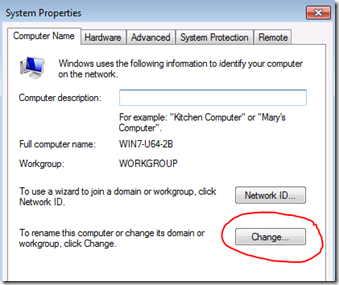
- In the resulting window select “Change Settings”

- Slect “Change” again

- Enter the corporate internal Domain name, such as MyDomain.local in the Domain box and click OK

- You will be prompted for a domain account with privileges to join a PC to the domain, a Domain Admin. Enter it and the password and you should receive a message advising you have been joined to the domain. Be patient it takes a little longer as this is a slow link compared to the LAN.

- You now need to reboot the connecting PC.
- In order to authenticate to the corporate network at logon and work as if on the corporate LAN, you need to connect the VPN before logging on to the PC. When the PC reboots press Ctrl+Alt+Delete as you normally would, and then choose “Switch User”

- You will then be presented with a new option, a little blue icon in the lower right corner.

- Clicking this allows you to choose to connect to the corporate network, by using the VPN. After entering your credentials you will see the familiar VPN connection automatically start, it will connect, and you will be authenticated to the domain.

- Logon is a little slower of course due to the slow link, and the first time you connect it will have to set up the local domain profile. If you make use of redirected my documents, offline files, or have a lot of group policies logon can take a very long time while they apply and sync. If logon is too slow, you may want to review options available to the remote user. You will note that if you now try nslookup <servername> works as it should.
Note: If connecting from Windows 8, please see the following updated article: https://blog.lan-tech.ca/2013/03/02/windows-8-connect-to-vpn-before-logon/
Depending on the performance of the VPN connection, it is sometimes necessary for the network administrator to “tweak” a few Group Policies for slow network detection. The following policies can assist with this:

